We’ve steamed it. Sautéed it. Put it in chowder. Used it in risotto. Stuffed it in squash. Turned it into salsa. Even put it in enchiladas. It is one of our favorite summer ingredients, and the last few fresh ears are at the market right now. It’s corn, and as sad as I am to see the season coming to an end, I have a great recipe that sends it off in style.
Corn kakiage.
And if you’re now asking “corn WHAT?,” let me introduce you to this Japanese izakaya (pub-style) recipe. It is a simple and delicious side to something like the grilled soy/ginger/garlic chicken I recently wrote about, or even served on its own as an afternoon or late-night snack.

Corn Kakiage Fritters: corn and scallions fried in a light tempura batter
I’ve come across several versions of this recipe — pronounced “ka-kee-ag-ee” — in cookbooks like Izakaya: The Japanese Pub Cookbook by Mark Robinson as well as online, like this corn fritter recipe from the November 2010 issue of Australian Gourmet Traveler and ‘Still Walking’….Fresh Corn Tempura on the blog “Test 4 The Best.” These are, essentially, fried fritters of corn cut from the cob and bound with a thick tempura batter. Some recipes use egg in the tempura batter and others do not.
But my all-time favorite recipe for corn kakiage comes from Nancy Singleton Hachisu’s Japanese Farm Food cookbook. No egg – just the clean, pure flavors of corn, scallions, and salt in a thick but light cake flour tempura.

Essential reading
I recently had a chance to meet Nancy at a Japanese Farm Food dinner in Manhattan. The event reinforced what I like most about this cookbook (in addition to the lovely binding that is reminiscent of kimono fabric): that the best dishes are often the simplest ones. Locally-sourced fresh ingredients and products from artisanal specialists result in spectacular and bold flavors on the plate.
Having moved to Japan in 1988 with the intent of learning Japanese and returning to the U.S. for graduate school, Nancy instead stayed in Japan after falling in love and marrying organic farmer Tadaaki Hachisu. The life that they, their sons and extended family have built on Tadaaki’s generations-old farm is inspiring to say the least. In Japanese Farm Food Nancy writes not only about Tadaaki’s innate knowledge of farming but an intense curiosity that led him to cultivate, from seed, such non-native plants as basil and pecan trees. And of course, crops on the organic farm include more traditional ones like okra, eggplant, rice, cucumbers, squash, corn…the list goes on and on.
It shouldn’t come as a surprise, then, that Nancy is a leading voice in the Slow Food movement both in Japan and abroad and teaches home cooking in Japan in addition to running an English immersion preschool/after-school program called Sunny Side Up! A perfect — though not traditionally Japanese — union of cultures, family, food and passions.

Nancy Singleton Hachisu and me at a Japanese Farm Food dinner in New York City
Nancy kindly allowed me to post her recipe for corn kakiage and passes along these helpful tips that you’ll only find here!
- Be sure to skim errant corn kernels from the oil quickly to avoid popping. Also using one of those frying screens could be useful.
- Don’t reuse the oil the next day even if it looks clean. Better to cook all the batter. Frying releases water into the batter which will result in more oil absorption the second day.
- If the corn lacks flavor increase the scallion amount.
- The ice cubes in the batter or chilled sparkling water chills the batter for less oil absorption.
This is a great dish for the vegetarians and vegans out there too. To build on the flavors you could add some finely-diced serrano or jalapeño chiles, minced cilantro or grated lime zest, but none of those things are necessary. Part of the beauty of this dish is just how simple and essential it is.

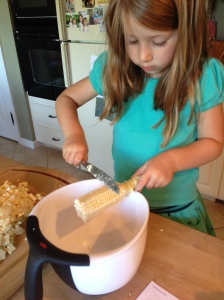
Someone really likes fresh corn
Corn Kakiage Fritters
Ingredients:
6 young corncobs*
2 scallions or 4 fat chives, chopped into fine rings
Best-quality rapeseed (canola) or peanut oil
1 cup (150 g) unbleached cake flour**
1 cup (250 cc) cold sparkling water
1/4 teaspoon fine white sea salt
6 large ice cubes
Fine white sea salt or organic soy sauce, for dipping
Set the corncob in a large bowl and cut the kernels off the cob with a sharp knife. After all the kernels are removed, go over the cob with the back of the knife to remove the last bit of corn from the cob. You should have about 3 1/2 cups (850 cc). Add the scallions (about 4 to 5 tablespoons) and toss with your fingers to distribute and break up the kernel clumps.
Line a cookie sheet with a thick layer of newspaper, then put a layer of paper towels on top. Set next to the stove. Over low heat, warm 2 inches (5 cm) of oil in a 10-inch (25 cm) frying pan.
Whisk the flour with the sparkling water and salt in a medium-sized bowl. Dump the corn kernels and scallions into the batter, add the ice cubes, and stir. Remove the ice cubes.
Increase the heat on the oil to medium-high; the oil should not be smoking. Test the oil with a drip of batter before starting. It should sizzle and immediately form a small ball as it hits the oil but should not brown. Adjust the oil temperature as needed.
Ladle 4 individual scoops of batter with a soup ladle into the pan (like pancakes) and cook over medium-high heat until golden brown on the bottom, about 5 minutes per side depending on the heat adjustment. Carefully turn over using two heat-resistant curved rubber scrapers. Cook until the second side is golden brown and oil bubbles have largely subsided (indicating water has cooked out).
Remove from the oil with a slotted skimmer to the prepared newspaper and paper towel-lined cookie sheet. Eat immediately with fine white sea salt or soy sauce.
Makes 8 fritters.
Go over the cob with the back of a knife to remove the last bits….
* We used 3 mature (large) ears of corn and got roughly the same quantity of kernels.
** If you don’t have cake flour on hand, don’t let that dissuade you. You can use 1 cup of sifted all-purpose flour, REMOVING 2 tablespoons of it, and replace those two tablespoons with 2 tablespoons of cornstarch. Sift these together several times through a fine mesh sifter to evenly combine. Voila – 1 cup of cake flour.
Parent rating: Five stars. Light, crispy, chewy and not quite like anything you’ll get at most restaurants in the states. Make these for your next informal dinner party and you’ll wow your guests. Additional toppings can really put these over the top if you want to experiment a little. I bet some smoked salmon would be delicious, as would a simple condiment made with chopped scallions, cilantro, chiles and lime.
Kid rating: Four-and-a-half stars. Daughter 1 finished hers before anything else on her plate and asked for another. Daughter 2 didn’t quite finish hers…but I attribute that to the three drumsticks she had before even tucking in to these. The corn kakiage were big hit with the girls that will be back on the menu just as soon as we can get our hands on more fresh corn (I refuse to believe corn season is REALLY over….).
Thank you, Nancy, for a wonderful recipe and a simple, kid-friendly introduction to a very satisfying Japanese dish!

One kakiage just isn’t enough